Hey guys, so for the past few months I've acquired quite an obsession for DYLANLEX jewellery but I can't afford it soo it's mostly been a stalk-on-Instagram kind of obsession. I pretty much check her account everyday... Is that really as creepy as it sounded or can we just say that I'm a devoted fan?Nonetheless I needed to do something about myobsessionso I decided to try and create my own DYLANLEX inspired necklace. And hence begins the obsessive online shopping exploration for supplies. I scoured all over the internet. Literally. I scoured over hundreds of pages, and thousands of necklaces (maybe a slight exaggeration) but It was bad. And amazingly enough, I only bought 3 necklaces.I ended up spending about $50 for all my supplies (much less than $1000) but it was mostly due to the fact that I bought everything online and had to get it shipped. And why did I buy everything online? Well, I wanted to provide you guys with links to where everything was purchased so you could recreate the DIY with exactly the same supplies. I thought it would be more helpful than using a one-of-a-kind vintage necklace that belonged to some lady from the thrift store. But of course if you decide to take that route or use the necklaces you have lying around your home you can save way more money than I did. I'll provide the links for all my supplies down below.Ah, now leading into the tutorial... Well it's really not that hard, just very time consuming. It took me about a week and a half to work on it because I would work on it in short intervals here and there. It especially takes longer when you need to film it and set up and rearrange your filming equipment, but I'd say it can easily take a day to complete.SuppliesOld necklaces and chainsTwo pairs of pliers (A flat nose plier and a 3-in-1 plier)Jump ringsAnd charms (optional)Step 1After you collect your necklaces, take them apart with the pliers you have. Disassembling them will help you lay out your vision and play around with placement. I played around with my placement so many times. Once you find your desired placement take a picture for reference and then carefully move your layers aside leaving your first and second layer of necklaces/chains behind.TIP: Your first layer should be somewhat stiff and sturdy, this will help keep the rest of the necklace in place without slouching. I thought mine would be stiff enough but it began to slouch with the added weight. Basically, just don't use a normal chain for your first layerStep 2Try on your first necklace and hang the second necklace in place to see where it should be attached. Now this part gets a little confusing and somewhat frustrating. The reason we're trying it on to plan where it will be attached is because chains move. And what seems like a good placement when you have it laying down might not look good when it hangs on the curve of your neck. So plan where you will attach it as it hangs on your neck. Once you figure this out attach the ends to your first necklace and continue attaching jump rings evenly in between, I would usually do every two chain loops.Step 3Attaching jump rings: So this takes some practice and I tried to show you guys how to attach them in a close up but I'll explain it further. The two types of jewellery pliers you need are: Flat nose pliers and 3 in 1 pliers with a round tip. With the flat nose pliers you will hold your open jump ring. With the 3 in 1 pliers you will curve the opposite open end in with that rounded tip. And that's it, it took me some getting used to (because I have bad hand eye coordination) but you do eventually get the hang of it.Step 4Repeat step 2 with every layer. Now would also be a good time to add charms! I bought my silver teeth charms from etsy thinking I would add them in, but they ended up making the necklace too busy so I preferred to exclude them. I'll link them below nonetheless.And you're done!
Links to products:I hope you all enjoy this tutorial, let me know what you think and send me your creations! I would love to see what you come up with.Till Next time! xxFind me here:

Friday, March 14, 2014
A Silver Statement Necklace DIY


Saturday, March 8, 2014
Spring Hair Trends: The Milkmaid Braid

Hello everyone! I'm so excited to share this hair tutorial with you all!
I'm especially excited to share that there will be some new changes occurring here and on my Youtube channel. It just feels like the right moment to rebrand myself and have a cohesive style on my blog website and social media ~~so profesh~~
As for the hair tutorial I filmed this tutorial in the hopes of sharing one of my favourite hair styles with you all. I've seen it all over the red carpet and I'm so pleased to see that it's come back in style! It used to be my favourite hairstyle as a kid, and it was my moms too. I think it's due to her obsession with Frida Kahlo.
Wednesday, May 1, 2013
New frames from Warby Parker

It's time to embrace the four eyes once again.
Ever since I discovered I needed glasses I wanted nothing more than to wear contacts. After wearing those for more than 6 years I now wanted nothing more than a nice smart pair of glasses and I've found them. Say hello to my new Tenley Warby Parkers. I got them in the shade Midnight Blue knowing that they would appear almost black in most lighting and I'm so pleased with the way they look.
For those of you who don't know, Warby Parker is an online optical store that offers costumers affordable and stylish glasses for a fraction of the price. All glasses are set at the standard price of $99 for American costumers and $120 for Canadians and this includes the frames and anti-reflective pre-scripted lens. Because it's an online store, they offer you the chance to select 5 frames you want to try out and WP will send them to you free of charge for a 5 day trial period for you to try them on. Only drawback is that it's exclusively for American citizens. So my only option was to photoshop each frame onto my face. They do have virtual-try-on's available on their website but that was just not doing it for me. If you weren't sold yet, just wait till you hear this. Not only are you buying glasses for an extremely affordable price, but they give a pair to someone in need for every pair you purchase, Aww!
***
I had some issues with the initial shipping process, but that was only because I forgot to send in my PD measurements and they couldn't ship my glasses until I had sent them in. After that, and a few emails with their lovely costumer service representatives my glasses were well on their way. It took 4 days for my glasses to arrive from the Friday I received my confirmation email to the Monday afternoon when they arrived on my door step. Such speedy shipping!
Overall, I'm extremely pleased with everything and I hope I can buy another pair when I go to one of their showrooms in New York this summer.


Till Next time! xx
Find me here:
Tuesday, April 30, 2013
The lookbook project

One of my last school projects for the year was to create a lookbook for a company of our choice, being the ZARA fan that I am, I took a whirl at illustrating their TRAFALUC 2013 collection from this past February. We had the choice between illustrating or photographing our images but in a spir of the moment overly-ambitious decision, I thought illustrating the collection would be easy peazy. Boy was I wrong. The jacket alone in the image above took me an entire day.
I wanted the illustrations to look graphic, while having the face and hair look realistic and have them peaking through. The background was going to be suggested and dynamic with the use of lines and I wanted to play with the composition to show the garments in detail at different angles.


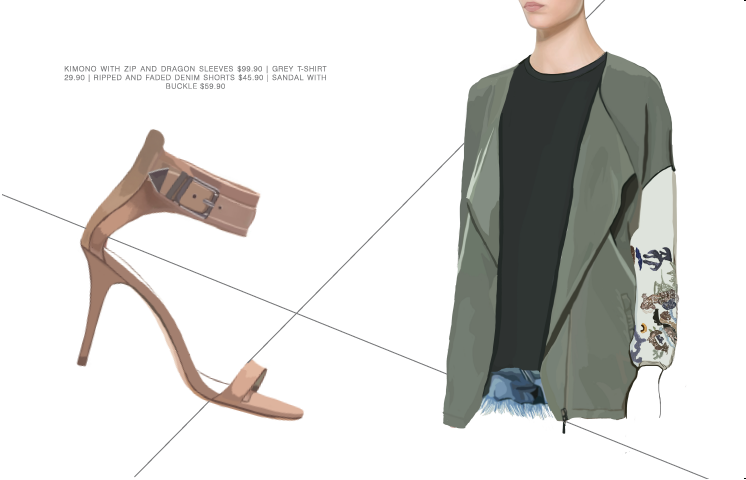
These were all illustrated on my Wacom Bamboo tablet on Photoshop Elements and put together on inDesign.
Till Next time! xx
Find me here:
Sunday, March 24, 2013
Beauty Products I've Been Loving
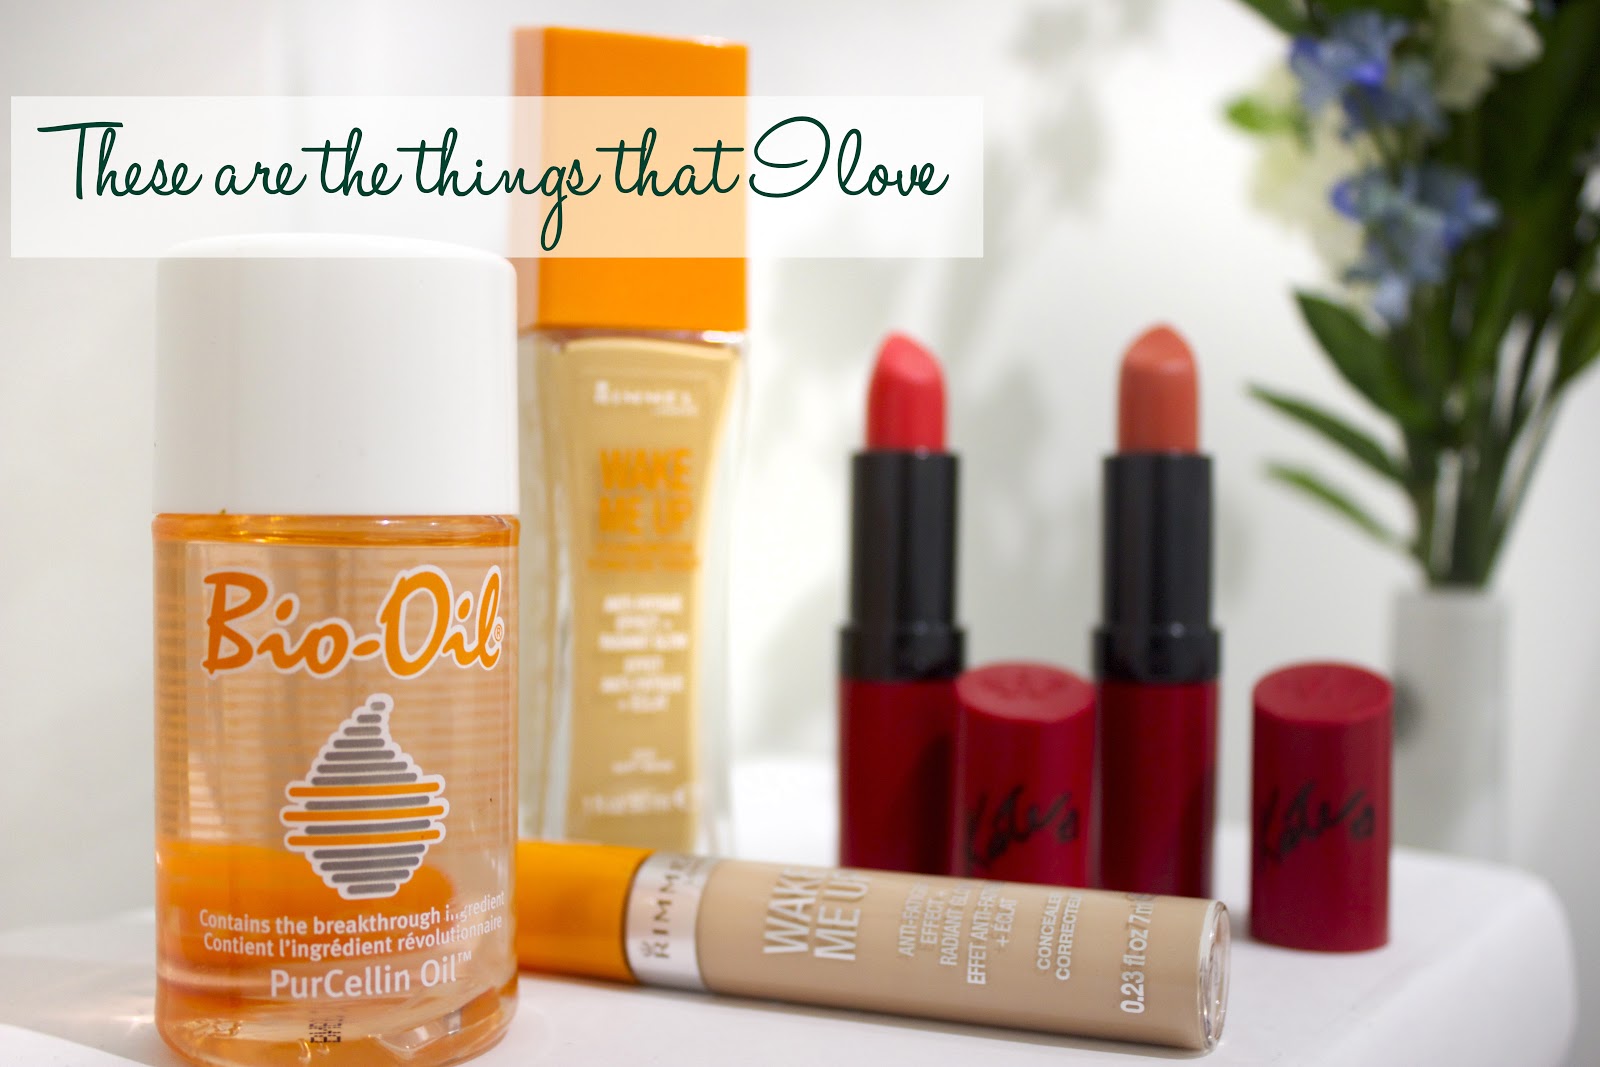
I imagine a lot of you Canadians have been waiting for the highly raved Wake Me Up collection as much as I have and let's be honest, it's about damn time. It's almost been a year since it's released in the Uk! I was this close to ordering it online and taking a whirl at guessing my shade but then a lovely friend messaged me and told me that she saw it at a Shopper's Drug Mart! Hallelujah!
I obviously went as soon as I could to pick it up and whilst I was there I figured I could use some other "essentials." This was two months ago and I have now used them long enough to tell you about the reasons why I love them.

I remember my friend Janelle raving to me about Bio-Oil two years ago and I was laughing because she told me this was used for stretch marks while being pregnant (among its many other purposes). It was funny at the time because Janelle is by no means pregnant and she was using it on her face. I didn't know it served many purposes and after doing some research I found out one of the main things it can help with is dehydrated skin.
Thanks to the windy winter we've had, my eye area has been extremely sensitive so I've been using this at night to help moisturize. It's helped SO much! I even see less fine lines around my eyes where concealer and foundation used to build up in. I know the idea of putting an oil on your face doesn't appeal to everyone but it hasn't broken me out and it can actually help with acne scars!

I've also been loving these two new matte Kate Moss lipsticks in 110 and 109. I think they're very smooth for matte lipsticks and the colours are very opaque. 110 is a very vibrant orange-red and 109 is more of a coral (even if the image makes it come off a bit brown).
I've been trying to get into the habit of wearing more lipsticks and I feel these are a perfect place to start for the spring and summer.

The long awaited Wake Me Up, I'm going to keep this review short as it has been on the market for quite some time now and all the UK beauty bloggers have already covered it. In regards to the Wake Me Up foundation, it has quickly replaced my old Maybelline FitMe foundation because of the thicker consistency that it offers and the nice pump applicator. It's also less dewy than the FitMe foundation but it still gives a nice natural glow.
***
The concealer is great as well, good coverage, but not heavy. It might not be good for anyone with a lot of redness to cover up and I'm not very pleased with the shade selection. I picked this one as I thought it would be the best shade for me but it has a bit of a pink undertone which I don't really understand... on the other hand, it's easily blend-able and looks very natural! I still love this product, I may just have to try a different shade the next time.
Have any of you had the chance to try these products out?
Are any of you as happy as I am about Wake Me Up finally being in Canada?
Let me know down below!
***
Till Next Time xx
Monday, March 18, 2013
The Wearable Art Show

***
Fashion is not art they said.
We all know that person…
I would have just loved
to see them seated at this week’s Wearable Art Show, where garments were pretty
unconventional to their standards.
The show was held last Tuesday at the Gladstone
Hotel and I had a wonderful time! I really enjoyed admiring all the garments
my friends and colleagues worked hard on over the last few months and I thought I’d
share with you some of the shots I managed to take.
I even doubt my images do some
of their garments justice, but we’ll have to thank the dodgy lighting for that.
***
 |
 |
 |
 |
 |
 |
 |
 |
 |
 |
 |
Till Next time! xx
Little side note: I've also started a Facebook page, all my blog posts and youtube videos will be posted there for your viewing experience :)
twitter | tumblr | youtube | instagram | facebook
Little side note: I've also started a Facebook page, all my blog posts and youtube videos will be posted there for your viewing experience :)
twitter | tumblr | youtube | instagram | facebook
Thursday, February 14, 2013
CollegeFashionista Feature

Just a quick little post sharing with you all the little street style feature I was a part of on CollegeFashionista. Make sure to check that out here.

 |
| Image provided by Christina Dun |
 |
| Image provided by Christina Dun |
Thank you to the lovely Christina Dun for featuring me. Check out her blog here :)
Till next time! xx :)
Sunday, February 10, 2013
Broke But Creative | Vintage Picture Frame Wall DIY

Hello Everyone!
For those of you Ryerson Fashion students that have been wondering, "what do I do with this random tub of glue?" I have a solution for you all!
I recently got around to filling up all the picture frames on my wall and filmed a little DIY for it on my youtube channel. I wanted the images to look vintage and "worn out" so I found this really cool technique online using an Acrilex Matte Gel, aka. the glue in our kits that no one knew how to use.
The great thing about this technique is that it's inexpensive and you can use it with a lot of different projects.

Supplies
1. A lot of old magazines - When looking for images keep in mind that everything you transfer will be flipped so no text!
2. Old Paintbrushes - Smooth, new and large paintbrushes would work best but the glue could also destroy them so stick to your old brushes.
3. Acrilex Matte Gel - I got this in my Uni Fashion kit so I'm not sure how much it costs. I'm sure you can find it in your local art supply store (close up image down below).
4. A Ruler
5. Scissors
6. Rubber Cement (optional - I used it for gluing down images in my collage)
7. Exacto Knife
8. Sheets of Paper - I found that this technique works best with thicker paper; watercolour, and matte print photo paper work the best. You could use regular printing paper but you have to be very careful.
9. Frames (not pictured) - My picture frames were all purchased at the thrift shop and painted white to match.

For the full tutorial watch down below:
I really love the way this Kate Moss image turned out, I had to touch it up with some black pencil crayon but I think it looks super grungy and antique.

Till Next time! xx
Monday, January 28, 2013
Hot Mess Results of a Blindfold and Makeup

Incase you ever thought I couldn't look any worse than I already do, prepare to be amazed. Ah yes. By the title I'm sure most of you have already guessed that I gave the Blindfolded Makeup Challenge a try... and by try I mean sitting down helplessly as a friend with no co-ordination attempts to do my makeup.
It was horrible.
If you can sit through long enough to see the horror unfold in my new video you will witness the results first hand (and bless you for sitting through it). I've just decided to try it out because I always enjoyed watching other YouTubers give this challenge a whirl.... I also thought, "hey, I haven't posted a video in a while so maybe I should do something ridiculous as a laugh".
It was either this or give myself the Miley haircut.
Here's the video for your entertainment. So when you feel as though your life has turned to shit and need a good laugh, set aside your self-pity and come laugh at me instead.
Audrey doing my makeup blindfolded:
Me doing Audrey's makeup blindfolded:
Till Next Time xx
twitter | tumblr | youtube | instagram
Sunday, January 27, 2013
StyleCircle.co's student profile on moi

If you follow me on instagram... and twitter... and Facebook... then you'd know the stylecircle.co recently did a little interview about me (because I've been posting about it everywhere but here, but not anymore...hehe). Can I call it an interview? I answered questions. I suppose I could. But if you all want to get technical, it was a Student Profile on me and my YouTube/Blogging career.
I'm obviously super-duper excited about this so please go and check it out!
The article link shall be here
The guys at the stylecircle are also really great people and fellow classmates of mine so be sure to check out their other posts too!
pce and blessins xx
twitter | tumblr | youtube | instagram
Tuesday, January 22, 2013
Bliss - Triple Oxygen Mask - Review

I'm here to share the newly discovered wonders of Bliss Spa products. More specifically, the Bliss triple oxygen instant energizing mask, or as I now like to refer to it, the holy grail of bliss. I've been trying this new mask out for the past few weeks and I've fallen in love.

The bottle says this mask releases oxygen molecules and detoxifiers along with a dose of Vitamin C, anti-free radicals all while giving your skin a major moisture fix. It also claims to be a super-quick-fix for dull, tired, sallow skin. (For more details check out the amazing description on the sephora site). Everything the bottle claims is true, after using it your skin looks tight, glowy and subtle... weird way to describe it but totally true.
You literally need a pea size amount on your entire face and you get a huge 100 ml bottle for the price of $59 at sephora. I got extremely lucky and found this at Homesense (of all places) for only $25. Still quite a price tag for a face mask but I deem this product worth every penny.
***
While using the product you really only need one pump, its about a pea size amount and you must apply it to damp skin and massage it in until it becomes a foamy thick froth. The first time I used this I kept thinking, "this is weird, it feels like shaving cream and the bubbles are going to pop instantly" but boy was I wrong. The foam last for about 10 minutes and as it dissolves you feel little bubbles popping on your face. The best way to describe it is like a pop rock candy but for your face.
It feels like little fairy kisses.
I imagine that feels totally beautiful.
***
This is the first face mask that has taken me into a full-on relaxing state of mind. My face literally feels like it's in bliss and washing it off afterwards leaves my skin very moisturized. I highly recommend this product for anyone who feels like they have dull skin and needs instant hydration. I also recommend applying this somewhere close to a chair or bed so you can lie down immediately and enjoy the bubbly sensation. I found that walking around my house popped the bubbles quicker than I would have liked and sitting doesn't feel quite as nice as lying down.
I also feel it necessary to say that this is my first bliss product but after this wonderful experience it certainly won't be my last.
Is there any other Bliss products I should try? Let me know in the comments down below!
till next time! xx
Saturday, January 19, 2013

Hello everyone! I recently purchased a new camera, a Canon EOS Rebel T3i to be exact and I honestly have no idea how to use it (insert your criticism here). In my defence, I had to buy it for a mandatory photography class but I was considering investing in one of these babies for a while now. So I suppose it was kind of a blessing in disguise when my teacher said "Go camera shopping this weekend".
and if you haven't guessed already, today's post is going to consist of (amateur) practice shots showing you guys what I'm wearing today.

I'll even have my expensive camera (that I don't know how to use) covering my face. Yes. I'm so clever"
-----Said everyone.

This was my attempt at a self timer Outfit-Of-The-Day, I didn't realize it wasn't in focus until after I uploaded, woops. You get the gist of it.
I'm going out for my best friends birthday today at a very nice restaurant/bar. It's casual.
 |
| "You know what else hasn't been done before? a kissy face! yes, I shall pretend to kiss my readers" |
The Face Of The Day ft. a winged eye and the products listed down below:

YSL Touche éclat Foundation in BD40, Tarte amazonian clay concealer in Light, Rimmel Stay Matte Powder in Sandstorm, Benefit's Coralista blush and lipgloss, Benefit Cha-Cha Tint, Urban Decay Naked palette, Benefit High Beam Highlighter, and Mac Eyeshadow in Woodwinked.

Oh dear, this last picture says a lot.
For starters I should go into detail about why you can see a faint little red handle bar moustache around my mouth. If you didn't already know (from reading my tweets),
I waxed off a layer of skin on my upper lip.
I didn't even know that was possible! Thankfully, it's not too red, and pretty unnoticeable with the little dab of Vitacilina I put on it but with my hyper-pigmentation it'll probably stick around for a few weeks.
That's why I thought I'd introduce you to the Half Handlebar Mustachio, please get acquainted and please don't hurt his feelings, you'll be seeing Mustachio around for a while.
till next time! xx
Friday, January 18, 2013
Instagram Diary II

I haven't done an Instagram Diary post in a while and I thought now would be the right time to update you on what I have been posting over on my Instagram. Especially because I was in Mexico visiting all my family. For your sake, I picked a few of my favourite pictures because I realize I probably post too many pointless ones and this post would otherwise be really long.


1. Relaxing by the pool because the world was supposed to end tomorrow
2. A studded sunhat with a tan to match
3. From where I stand: Almost dropping my phone in the pool edition
4. Looking for Alaska with Pacific Blue Nails
5. A cut up Urban Decay Primer Potion, look at all the product left inside!
6. The Pool necessities with Coco Rocha and Vogue Mexico
7. Market Pinatas and fresh fruit
8. Exploring Downtown Mexico City
9. Brooke and I before heading out to dance (our bootys off)
10. Outfit of the Night
11. Being "Classy" and feeling tired at This Is London
12. The brand new re-usable Starbucks plastic cups ft. a London fog latte
Till next time! xx
Subscribe to:
Posts (Atom)